
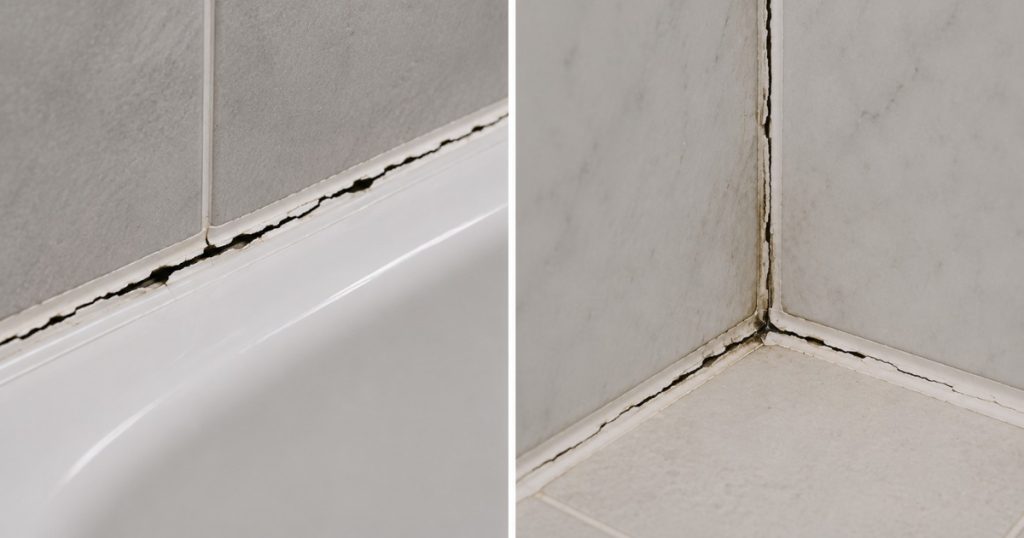
When bathroom silicone starts to crack, peel or separate, moisture can get into gaps that should stay protected. Knowing when to replace bathroom silicone helps you maintain a cleaner, tidier and better-protected bathroom. The tricky part is that damaged silicone does not always fail overnight — in many cases it slowly deteriorates until the warning signs become impossible to ignore.
Knowing when to Replace Bathroom Silicone can help you maintain a cleaner, tidier and better-protected bathroom. The tricky part is that damaged silicone does not always fail overnight. In many cases, it slowly deteriorates until the warning signs become impossible to ignore.
For New Zealand homeowners, regular bathroom maintenance is well worth the effort. Bathrooms deal with steam, humidity and water every day, so even good-quality sealant will not last forever.
In this guide, we cover 10 clear warning signs that may indicate it is time to Replace Bathroom Silicone, along with practical advice on maintenance, removal and professional replacement.
Why Is Bathroom Silicone So Important?
Bathroom silicone creates a flexible seal in areas where rigid materials meet. You will commonly find it around shower trays, baths, basins, splashbacks, tiled corners and other joints that may experience movement.
Unlike grout, silicone remains flexible after curing. This flexibility allows it to handle small amounts of movement without immediately cracking.
However, silicone can deteriorate with age and regular exposure to moisture, cleaning products and temperature changes. Once the seal becomes damaged, it may no longer perform as intended.
This is why you should Replace Bathroom Silicone when clear signs of failure appear rather than waiting for the surrounding area to develop bigger problems.
Regular inspections only take a few minutes and can help you spot early damage before it becomes a real hassle.
1. Replace Bathroom Silicone When It Starts Peeling Away
Peeling is one of the easiest signs of silicone failure to spot.
Look closely at the edges where the silicone meets your tiles, shower tray, bath or basin. If sections have started lifting or pulling away, the seal is no longer properly attached to the surface.
Even a small lifted edge can create a gap where moisture may collect.
Silicone can peel because of age, poor initial preparation, movement or incorrect application. It may also lose adhesion if it was originally applied to a damp, dirty or contaminated surface.
If only a tiny section has lifted, you might be tempted to apply fresh silicone directly over it. This usually does not provide a neat or durable result.
For a proper repair, you generally need to remove the failed material, prepare the surface and Replace Bathroom Silicone with a suitable wet-area sealant.
2. Cracks Have Appeared Along the Silicone
Cracking is another clear warning sign that bathroom silicone is failing.
Silicone should stay flexible enough to handle normal movement. As it ages, it often becomes harder, brittle or damaged. You may first notice fine surface cracks that gradually deepen and spread along the joint.
Once cracking is visible, it is worth investigating rather than treating it as purely cosmetic. Small cracks can quickly worsen with ongoing movement and daily water exposure.
Check whether the silicone is still firmly bonded on both sides of the joint. If it feels brittle, splits when touched, or has separated from the surface, replacement is usually the better option. Removing the failed material and applying fresh silicone restores a cleaner, more consistent seal and helps protect the surrounding area.
3. Mould Keeps Coming Back After Cleaning
Bathrooms naturally create humid conditions that encourage mould growth when moisture lingers on surfaces.
Modern sanitary silicone often includes mould-resistant properties, but no product can prevent mould indefinitely. Surface mould can sometimes be cleaned away, yet if dark marks stay embedded in the silicone or return soon after cleaning, the contamination has likely penetrated the sealant. At that point, cleaning alone will not restore it.
It may be time to replace the bathroom silicone, especially if it is also peeling, cracking or separating. Good ventilation plays a key role in managing moisture. New Zealand’s official Tenancy Services provides clear guidance on ventilation requirements and reducing moisture in bathrooms. The same principle applies whether you rent or own: lowering excess humidity helps create a healthier bathroom and reduces recurring condensation problems.
4. The Silicone Has Changed Colour
Fresh bathroom silicone usually has a clean and consistent appearance.
Over time, white silicone may become yellow, grey or permanently stained. Clear silicone can also become cloudy or discoloured.
Discolouration does not always mean the seal has completely failed. However, a major colour change can be a sign of ageing, contamination or deterioration.
If the silicone looks rough, stained and tired despite regular cleaning, replacement can make a noticeable difference to the overall appearance of your bathroom.
This is particularly useful when refreshing an older bathroom without undertaking a full renovation.
A clean silicone finish around the shower, bath and basin can instantly make tiled areas look sharper and better maintained.
5. Gaps Are Forming Around the Shower or Bath
Visible gaps should never be ignored.
Silicone can shrink, separate or pull away over time, leaving open spaces between surfaces. You may notice these gaps around a shower tray, bath edge or internal tiled corner.
If water regularly reaches these areas, moisture may travel into the opening.
You should Replace Bathroom Silicone when the existing material can no longer maintain a continuous seal.
Before applying new silicone, however, check why the gap has appeared. If there is significant movement between surfaces, a simple replacement may not solve the underlying issue.
Large or repeatedly opening gaps may require professional assessment.
6. The Silicone Feels Hard and Brittle
Good bathroom silicone should stay flexible.
If an older joint feels hard, brittle or crumbly when you check it, the sealant is likely nearing the end of its useful life. Age, bathroom conditions and repeated cleaning can gradually reduce its performance. Once it becomes brittle, it tends to crack instead of flexing with normal movement.
You do not need to wait until the seal completely fails. If the silicone has hardened and shows other signs of wear, replacing it early helps stop gaps from forming. This is particularly important in high-use showers that face water every day.
7. Water Is Getting Behind the Silicone
If you can see water sitting behind a transparent silicone joint or notice ongoing dampness around a sealed edge, investigate the issue straight away. Water should never be trapped behind the silicone.
Moisture may have entered through a crack, gap, or area where the sealant has lost adhesion. Simply adding a new layer over the old silicone rarely fixes the problem and can trap moisture inside the joint, making it harder for the area to dry.
Instead, remove the failed material completely and allow the surface to dry thoroughly before applying a replacement. If moisture keeps returning or you suspect water is travelling beyond the surface, seek professional advice.
New Zealand homeowners can find official guidance on wet areas and internal moisture through the Ministry of Business, Innovation and Employment’s Building Code Clause E3 – Internal moisture.
8. You Notice a Musty Smell Around the Shower
A persistent musty smell can indicate moisture is remaining somewhere around the bathroom.
The smell does not automatically mean the silicone is responsible, but damaged sealant is worth checking as part of your investigation.
Look carefully around the shower tray, bath edges and tiled corners. Check for loose silicone, dark staining, gaps or damp areas.
If the sealant has failed, you may need to Replace Bathroom Silicone and inspect the surrounding area for moisture.
Do not simply cover old silicone with a fresh layer to hide the smell or staining.
The old material should be properly removed so the joint can be cleaned, dried and inspected before resealing.
9. The Silicone Keeps Lifting After Previous Repairs
Have you repaired the same section more than once?
If silicone repeatedly pulls away from the same area, something else may be causing the failure.
The surface may not have been properly prepared. Movement may be occurring between the adjoining materials. The wrong sealant may have been used, or the area may not have been fully dry during application.
In these cases, simply repeating the same repair is unlikely to produce a different result.
A professional can identify why the joint keeps failing and recommend a more suitable repair method.
When you Replace Bathroom Silicone, proper preparation matters just as much as the quality of the new sealant.
10. Your Bathroom Silicone Is Simply Old and Worn
There is no universal expiry date for every silicone joint.
The lifespan depends on product quality, installation, ventilation, bathroom usage, cleaning methods and the amount of movement in the joint.
Instead of replacing silicone according to a strict calendar, inspect it regularly and judge its actual condition.
Older silicone that remains firmly bonded, flexible and free from major damage may still be performing well.
However, if your sealant is old and showing several warning signs at once, replacement is likely worth considering.
When your bathroom silicone looks cracked, stained, brittle and partially detached, waiting longer rarely improves the situation.
How Often Should You Replace Bathroom Silicone?
Many homeowners want a simple answer, such as every three, five or ten years. In reality, the condition of the silicone matters more than its exact age.
A well-applied, high-quality silicone joint in a well-ventilated bathroom may remain in good condition for years. A poorly applied seal in a heavily used shower may fail much sooner.
The best approach is regular inspection.
Check your bathroom silicone every few months while carrying out normal cleaning. Look for changes in adhesion, flexibility and appearance.
You should consider replacement when you notice:
- Peeling or lifting
- Cracking
- Permanent mould staining
- Open gaps
- Brittle texture
- Loss of adhesion
- Persistent moisture around joints
Early replacement is generally easier than waiting until large sections have completely failed.
Can You Put New Silicone Over Old Silicone?
Technically, new silicone may stick in some situations, but applying it directly over old, failed sealant is generally not the best approach for a proper long-term repair.
Old silicone may contain soap residue, moisture, mould or cleaning product contamination. These can affect how well the new material bonds.
Layering new silicone over damaged material can also create a bulky and untidy finish.
If you want to Replace Bathroom Silicone properly, remove the existing sealant first.
Carefully cut away the old silicone without damaging nearby tiles, shower trays or fixtures. Remove remaining residue using a method suitable for the surface.
Clean the joint thoroughly and allow it to become completely dry before applying fresh silicone.
Proper preparation gives the new sealant a much better chance of forming a neat and durable bond.
How to Replace Bathroom Silicone Properly
Replacing silicone requires more than squeezing a fresh bead over the joint.
- Remove the old silicone Carefully cut and scrape away as much of the failed sealant as possible. Work slowly around tiles, shower trays and fixtures to avoid damage.
- Clean the joint thoroughly Remove all residue, soap scum and contamination. The surfaces must be completely clean before you continue.
- Dry the area completely Allow the joint to dry fully. Do not apply new silicone to a damp surface.
- Choose the right product Select a silicone designed for bathrooms and wet areas. Confirm it is compatible with the surfaces you are sealing.
- Apply the new silicone Run a consistent bead along the joint and tool it neatly according to the manufacturer’s instructions.
- Allow full curing time Do not expose the new silicone to water until it has fully cured. Even if the surface looks dry, always follow the manufacturer’s recommended curing time.
Why Does Bathroom Silicone Keep Going Mouldy?
Recurring mould usually comes down to a combination of moisture, warmth, ventilation and cleaning conditions.
After every shower, water remains on tiles, grout and silicone. If the bathroom stays humid for long periods, mould has a better environment in which to grow.
Using an extractor fan during and after showering can help remove moisture. Opening windows where practical and wiping down wet shower surfaces may also help.
Regular cleaning is important too, but avoid using products that are unsuitable for your specific sealant or tile surfaces.
If mould has penetrated deeply into old silicone, repeated surface cleaning may not be enough. At that point, it may make more sense to Replace Bathroom Silicone and improve moisture management afterwards.
Should You Replace Silicone or Grout?
Silicone and grout have different jobs, so the right repair depends on where the failure has occurred.
Grout is generally used between tiles on the same tiled plane. Silicone or another appropriate flexible sealant is commonly used where movement needs to be accommodated, including certain corners and junctions.
If grout has been incorrectly used in a movement joint and keeps cracking, replacing it with more grout may not solve the issue.
Likewise, you should not automatically fill every damaged grout joint with silicone.
A tile and grout specialist can assess the location and determine which material is appropriate.
Using the correct product in the correct area can help create a more durable result.
The Smart Way to Protect Your Bathroom
The smartest way to deal with silicone problems is to catch them early.
You do not need to inspect every joint each day. Simply pay attention while cleaning your bathroom and watch for changes.
If silicone starts lifting, cracking or separating, investigate the cause. If mould has become permanent or the sealant has lost flexibility, replacement may be the most practical solution.
Regular ventilation and cleaning can also help your new silicone stay looking good for longer.
The key is not to wait until the seal has completely fallen apart.
Final Thoughts: Replace Bathroom Silicone Before Minor Damage Gets Worse
Bathroom silicone plays an important role in keeping joints sealed and your bathroom looking clean. When you notice peeling, cracks, stubborn mould, gaps or recurring moisture, it may be time to Replace Bathroom Silicone before the damage becomes more difficult to manage.
Proper replacement means removing the failed sealant, preparing the area thoroughly and applying a suitable wet-area silicone. If the problem keeps returning or you suspect a deeper leak, professional help can save you time and hassle.
Acting early can help protect your bathroom and maintain a fresh, tidy finish for years to come. For professional silicone replacement and reliable bathroom solutions, call our team today on 0800 08 4444.